vATIS - User Guide
vATIS configurations are available for Langen and bremen FIR airports.
Installation
vATIS software itself is not included within any Euroscope packages but can be installed separately. The latest configuration profile can be downloaded from GitHub for Langen or Bremen. It's also included in the Langen FIR NAV Package (Plugins => vATIS).
The profile can be saved everywhere on your computer and does not need to stay inside the NAV Package. All config updates will be received automatically when the profile is loaded within vATIS.
How to use vATIS
Importing profiles
To install a profile, open vATIS and use the Import button to navigate to the .json configuration file downloaded from GitHub. Once imported, the profile will automatically update itself whenever changes are made by the NAV-Department, so manual re-downloading is not required for subsequent updates.
User interface overview
To access the user interface and connect an ATIS, double-click the desired profile.
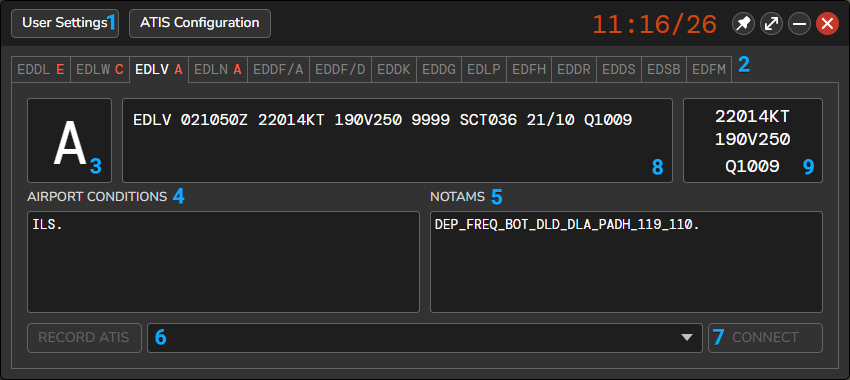
vATIS User Interface
- User Settings: In the settings dialog, configure your VATSIM login credentials and rating. This only needs to be done once during the initial setup. Optionally, the own and shared ATIS update sound can be enabled/disabled.
- Airport selection: After opening a profile, you'll see several tabs displaying ICAO codes for all supported airports. Select the airport where you want to connect an ATIS. Note that the EDDF ATIS is divided into separate Arrival (EDDF/A) and Departure (EDDF/D) services.
- Current ATIS letter: Left-click to advance the ATIS letter or right-click to revert it. This can also be used to manually update/ping the ATIS letter for other controllers.
- Airport Conditions: These are special, predefined texts primarily used to select the current approach type in use. Click the "AIRPORT CONDITIONS" header to open the associated menu. Further information is provided below.
- NOTAMs: These are predefined texts for specific airport configurations (e.g., tailwind components for runways at EDDF) or departure frequencies. Click the "NOTAMS" header to open the associated menu. Further information is provided below.
- Selected Preset: Select the current runway configuration in use from the dropdown list so the ATIS announces the correct airport configuration.
- Connect: Connects the ATIS to the network
- METAR: Displays the current METAR information for the selected airport.
- QNH & Wind: Shows a quick overview of the current wind and QNH conditions.
Airport conditions overview (No. 4)
 Airport Condition Definitions window (example: EDLW)
Only one selection is possible! Do not select multiple approaches when it is not predefined already.
NOTAMS overview (No. 5)
 NOTAM Definitions window (example: EDDL)
Multi-selection for non-frequency NOTAMs is possible, but be careful to select only relevant options (e.g., don't use tailwind component information at EDDF if RWY 18 is closed). The available options differ between airports.
Important: After selecting an airport condition or NOTAM, this setting is saved for next time. Always verify that both airport conditions and NOTAMs are configured correctly before connecting an ATIS.
Do not modify the profile settings (except for selecting predefined options) or texts yourself. If you discover errors, please report them to the NAV-Teams.