Euroscope Usage - Tower
This guide is aimed at S1 controllers looking to control the minor airports in the FIR Langen. Below you will find a very basic introduction to the actions required to handle departures and arrivals.
Opening Euroscope and switching airports
When you open Euroscope, you will be met with an Open profile file dialog. Open the EDGG FIR - TWR PHX Night.prf (or Day) file. If the dialog does not open for you, uncheck the option Auto load last profile on startup under Other SET in the top taskbar and restart Euroscope.
Once you have opened the correct profile, you will see the following.
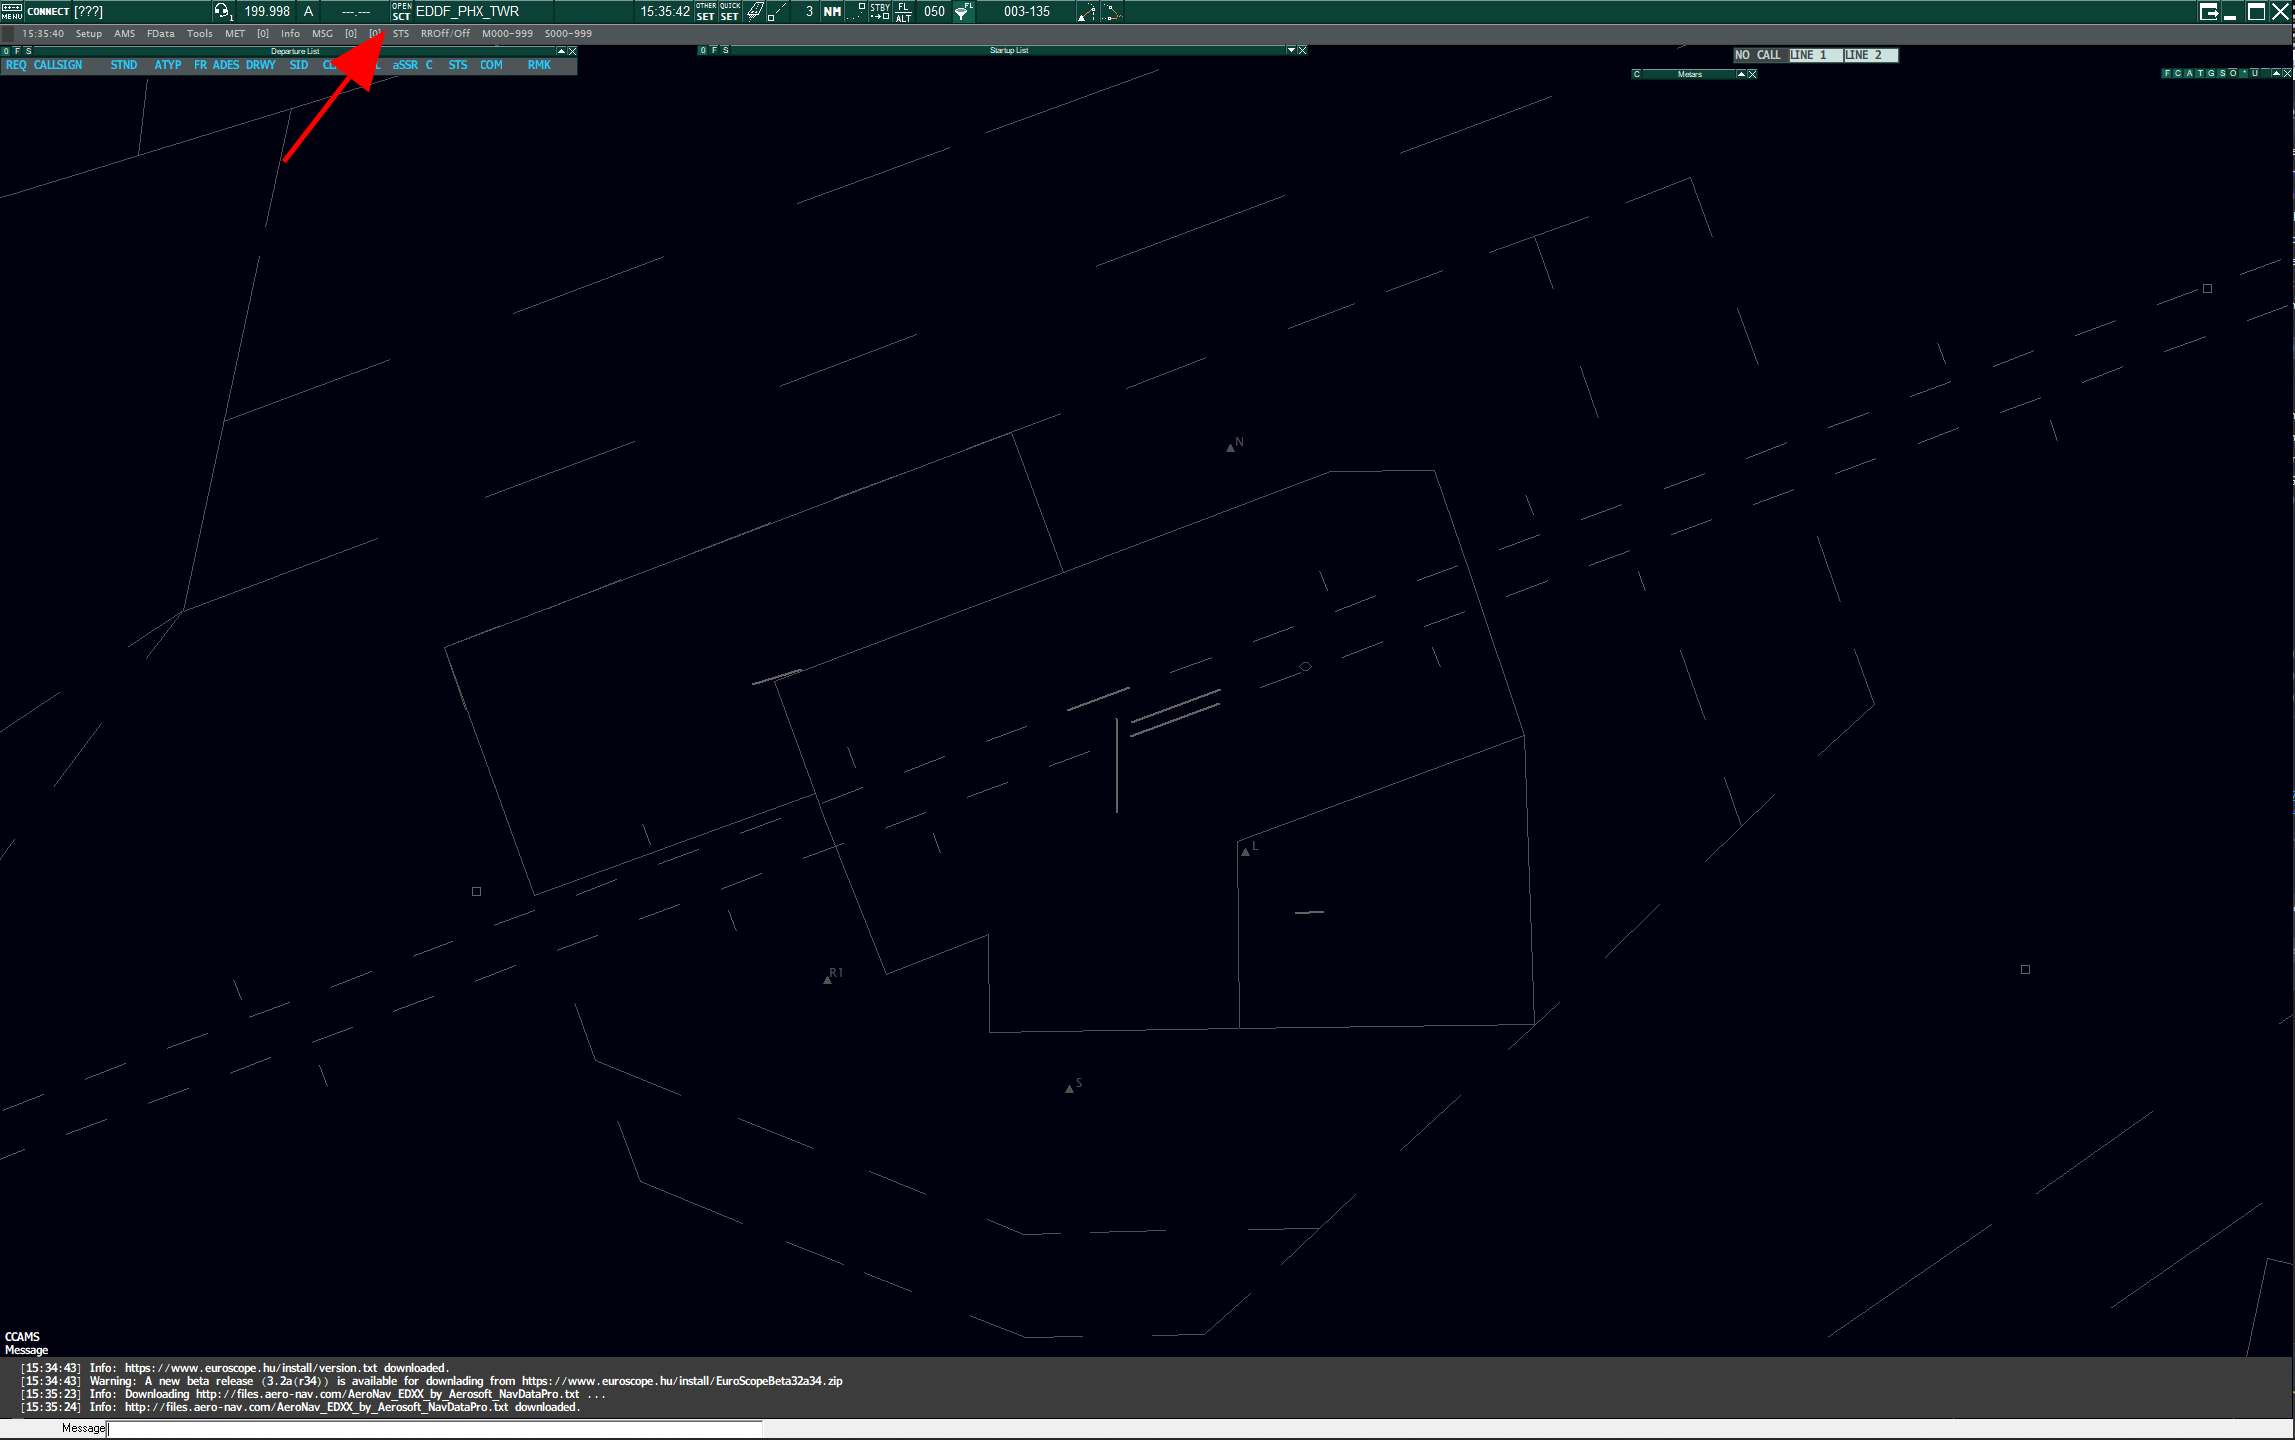
It is the radar view of Frankfurt Tower. However, we would like to switch to a different airport. The way this works in Euroscope is by opening a different .asr file, which tells Euroscope which lines to draw where. You can do so by clicking on the Open SCT button, which is highlighted in the screenshot.
Open SCT opens the depicted menu, where you can select one of the blue highlighted .asr files. If your airport is not listed there, you need to click Open (red arrow). This will open a Windows file dialog where you can select the correct .asr from the sector files you downloaded for EDGG EDGG\ASR\Ground or Tower.
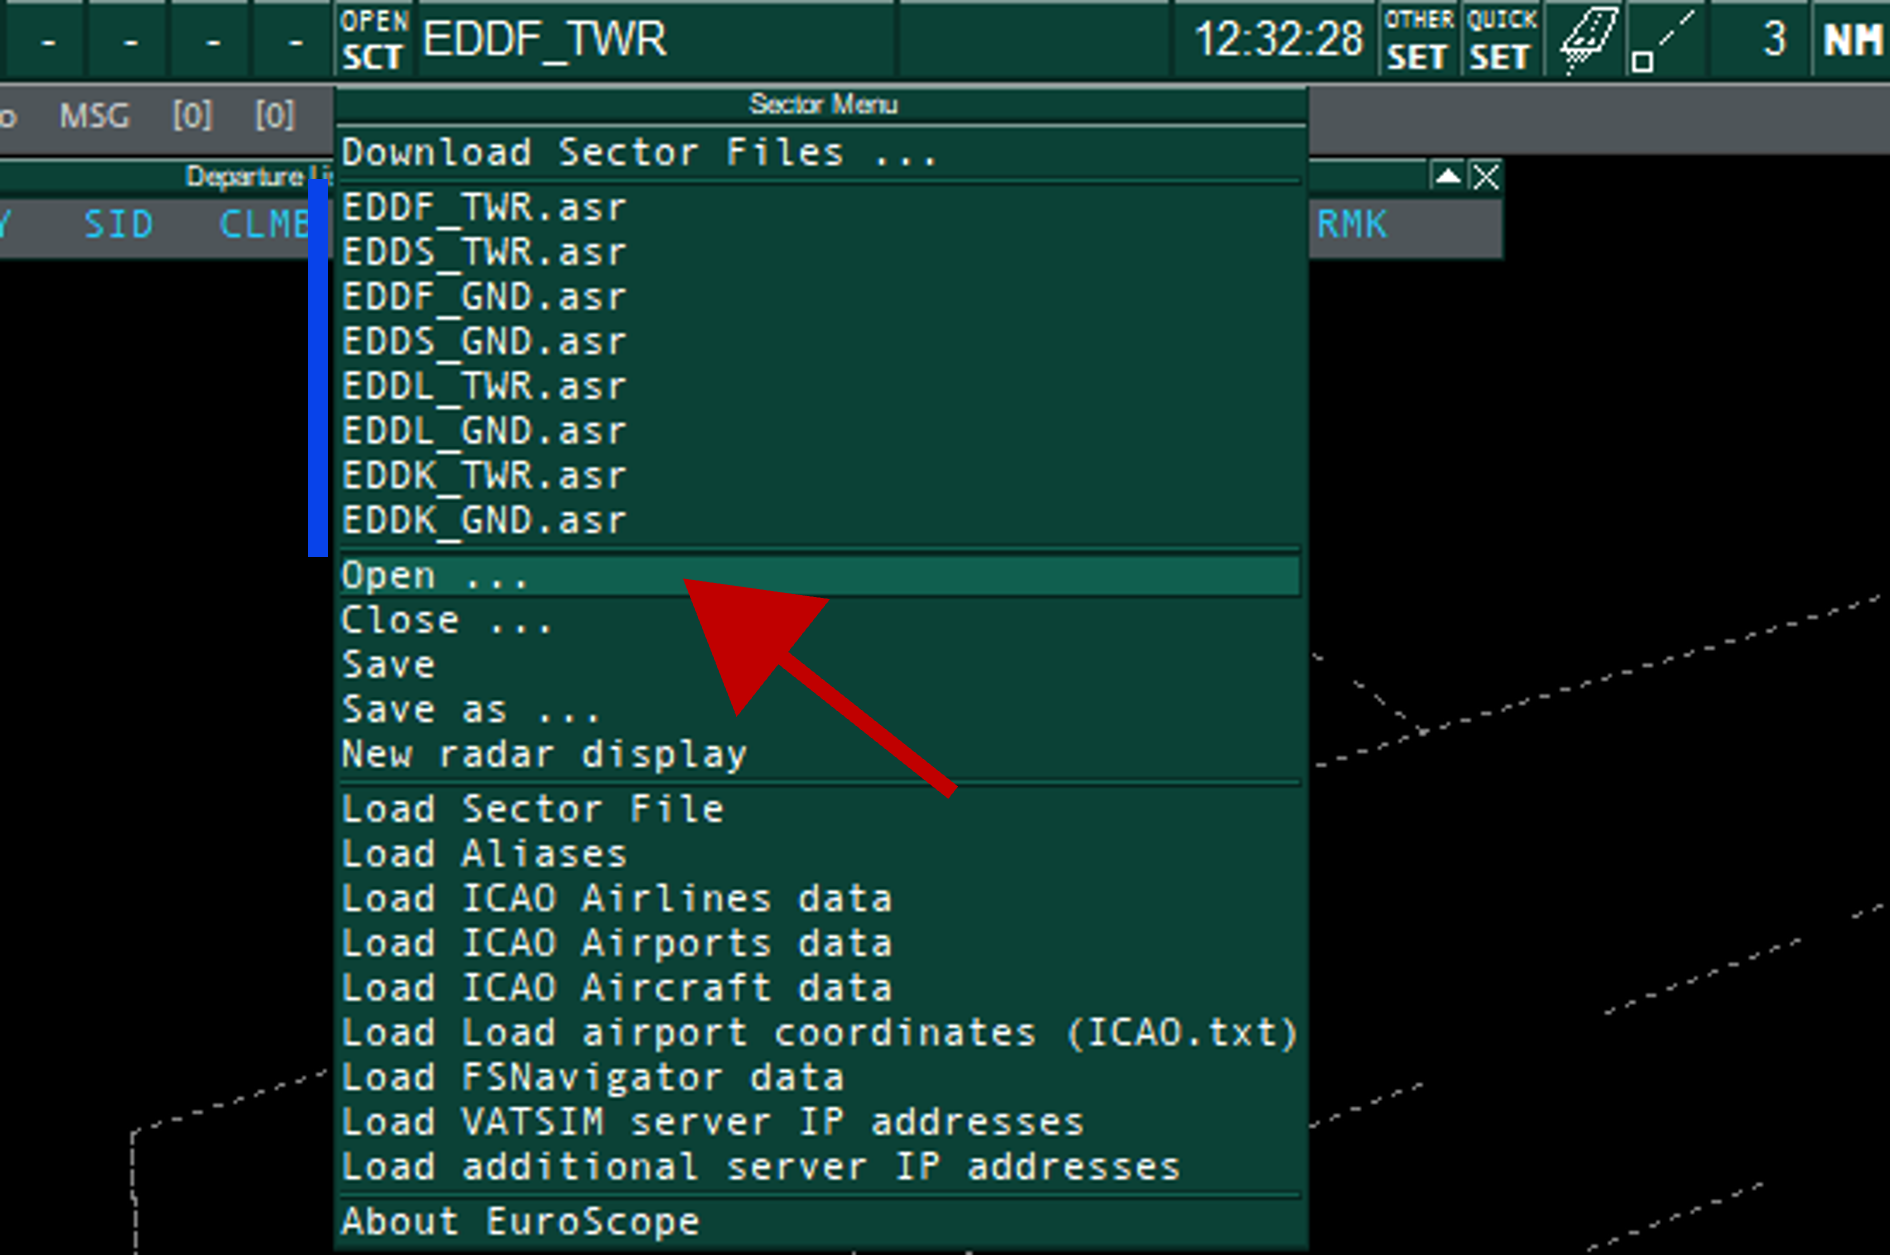
select or open different asr files at Euroscope
You can open multiple asr files and press F7 to switch between them. Additionally, you can close asr files in the Open SCT menu.
Additionally, you can open multiple instances of Euroscope to have different views on multiple screens. Connect the first instance as normal and then select To VATSIM via proxy as Select connection mode and enter your credentials.
Connecting to the Network
To connect to the network, click the connect button in the top left. It will open the Connect dialog, where you will have to enter your VATSIM credentials. Additionally, select your station from the dropdown menu. If it is not listed, enter it manually and set the correct Facility. Enter Ground/Delivery (STU1) as your rating. You can choose any server except the Sweatbox. Thereafter press Connect.
 Euroscope Connect dialog
You will see your station's ID, in this example, EDFH_TWR, as well as the primary frequency (119.650) in the top left corner if you have connected to the network. However, there are a few more things we need to do before we can start:
Datalink (DCL/PDC) Logon
We use the Topsky Plugin to offer PDC clearances. Read the guide here (German only) for further information. In real life, datalink clearances are not offered at small airports like Hahn or Mannheim. If you do not offer it, you should always remove "PDC/DCL Datalink [XXXX] - " from your controller info.
Activate airport and set active runway
Next, we need to choose and set the active airport and runway. Look at the current METAR, the TAF, and the local SOPs to determine the runway in use. Next, in Euroscope, click on the runway icon in the top menu (red arrow). This will open the Active airport/runway selector dialog. Here you can activate the airport (left two columns) as well as set the departure and arrival airports (see image).
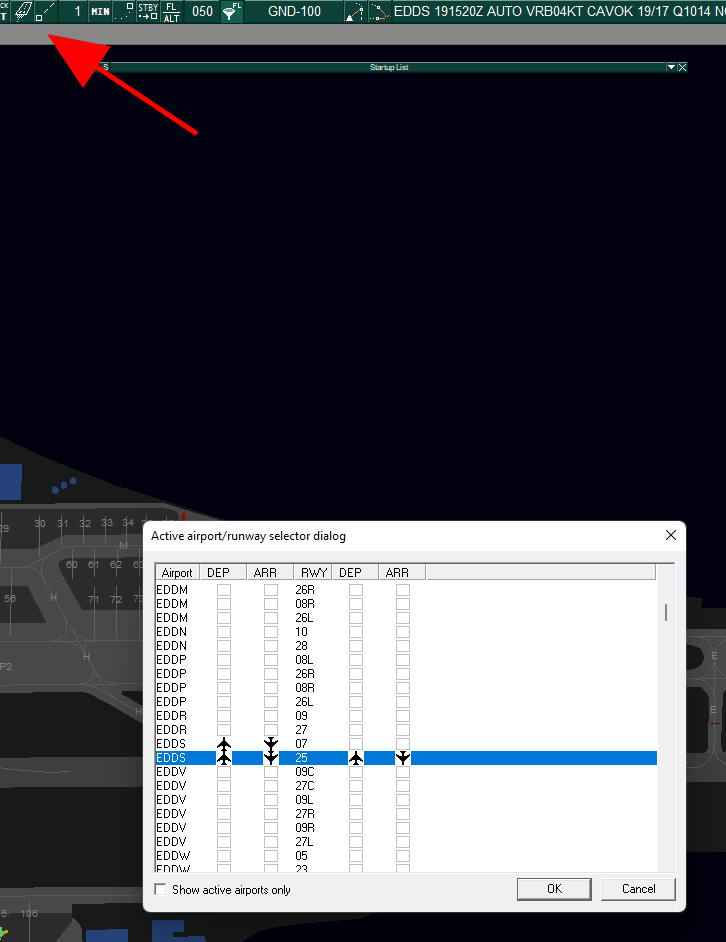 activate airport and set active runways
Set ATIS
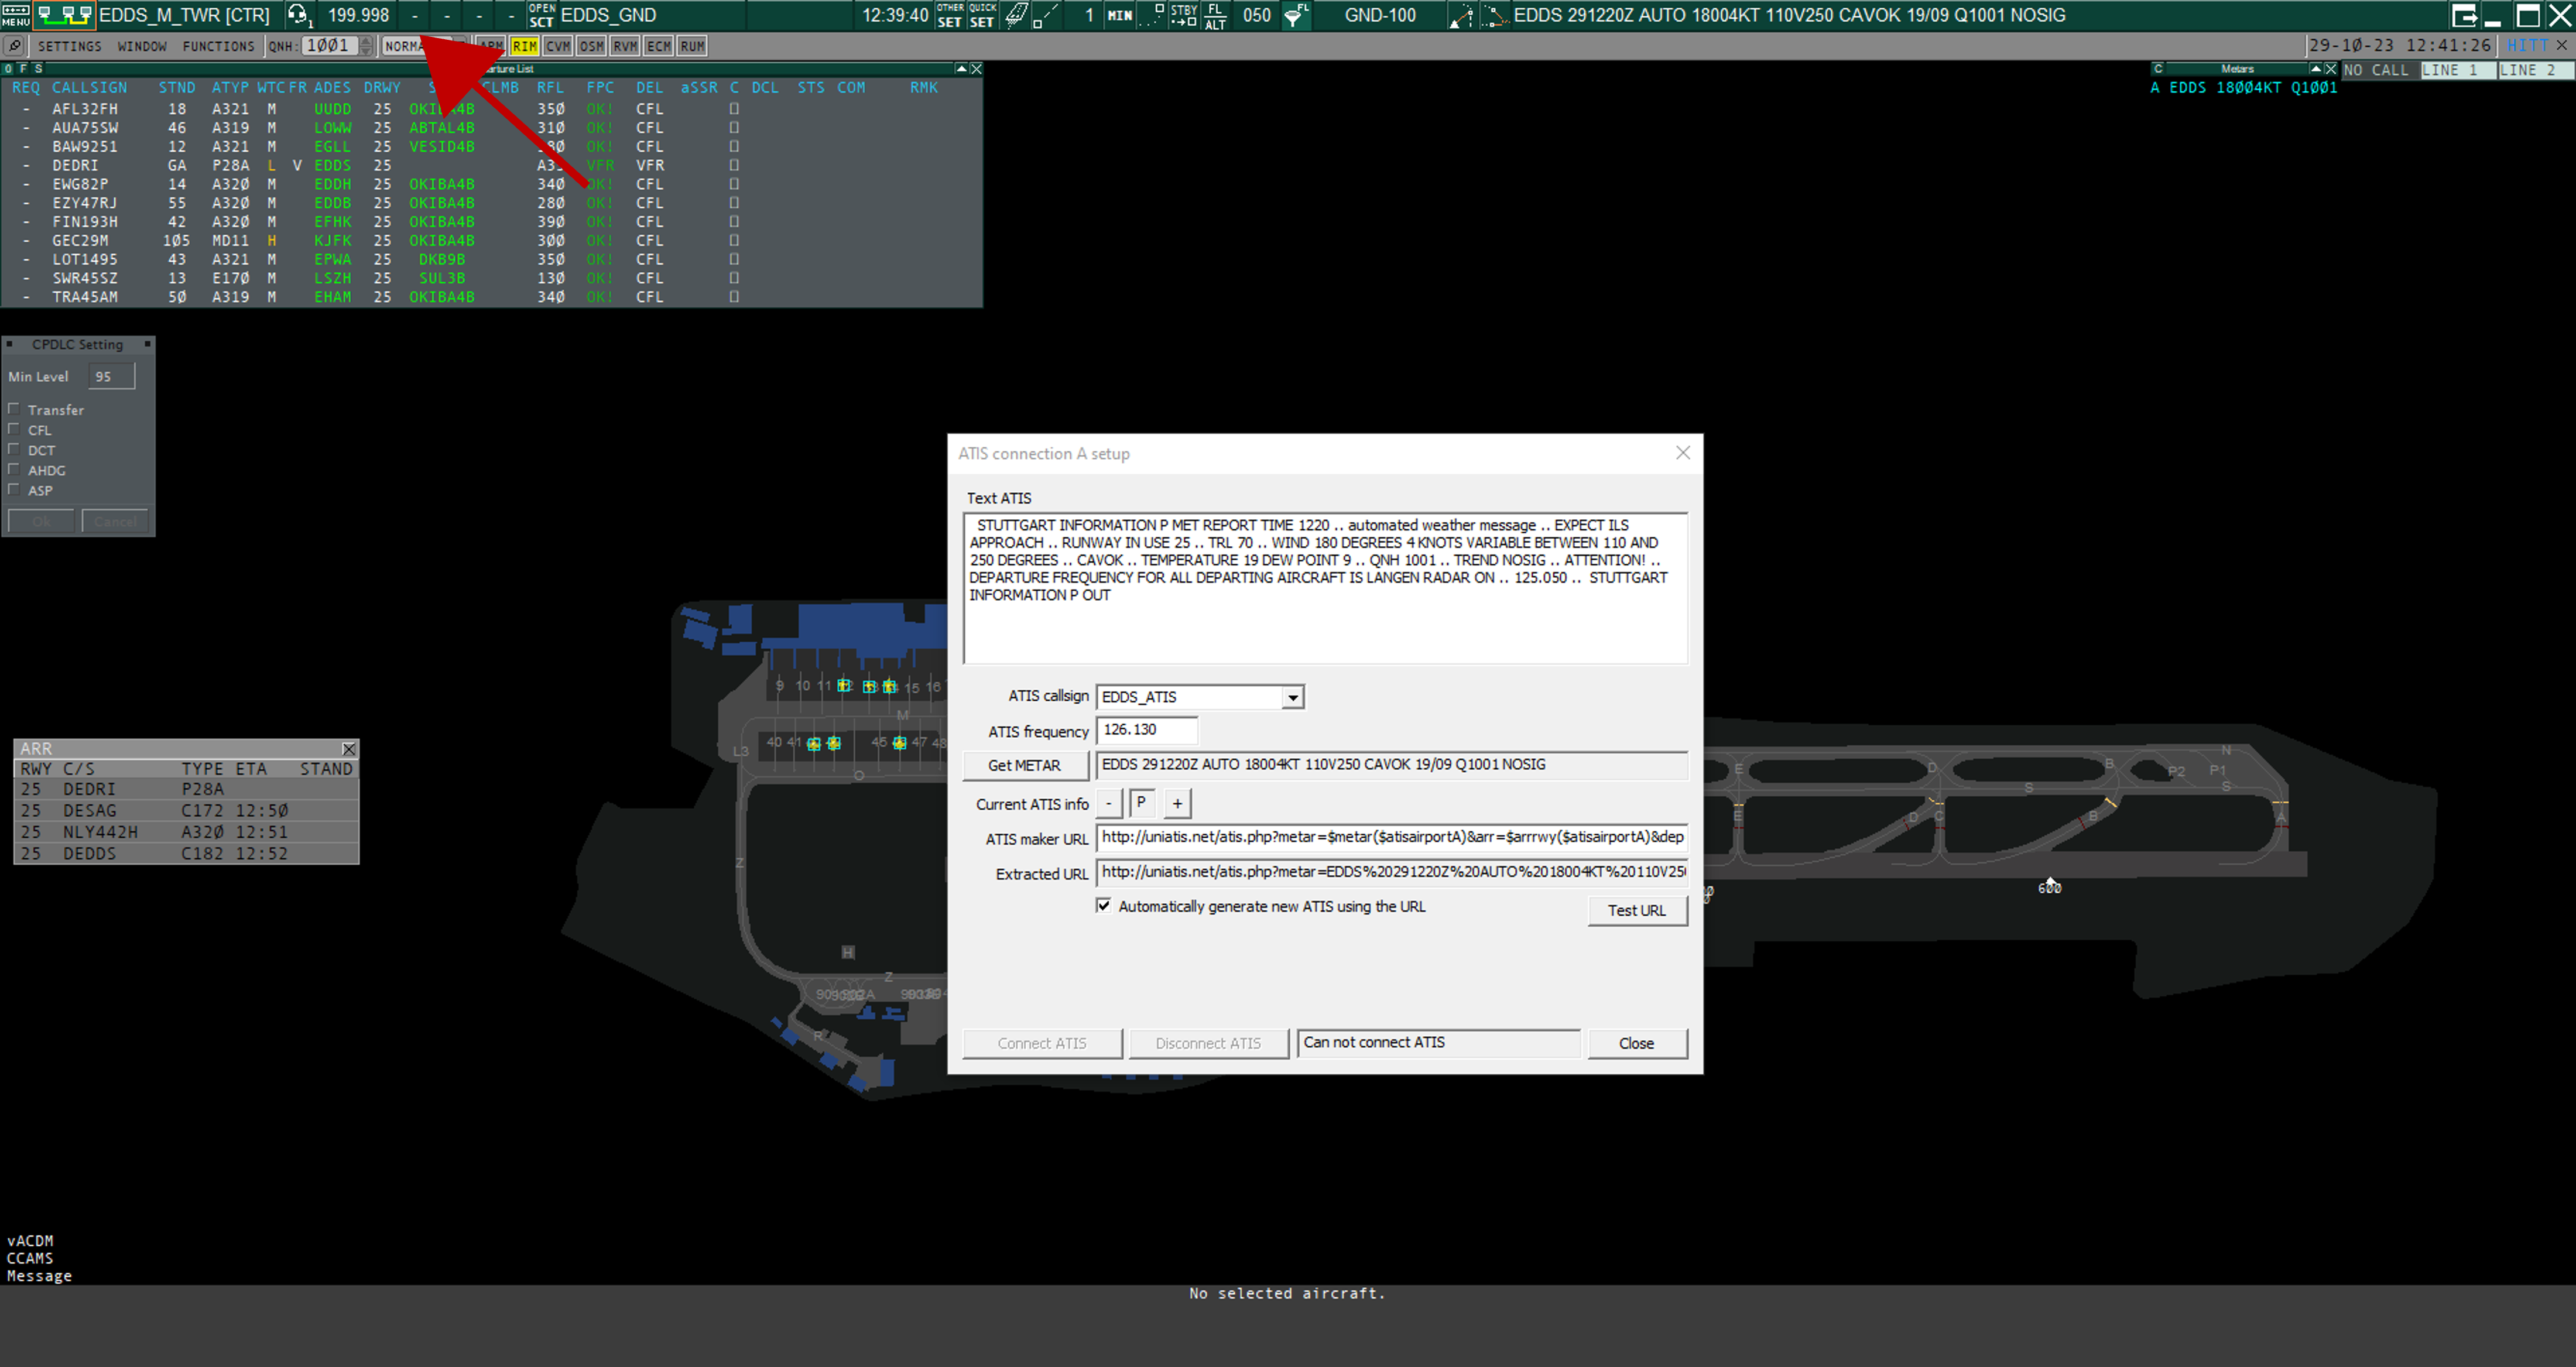
We need to set the ATIS (Automatic terminal information service) next. To open the ATIS Setup Dialog, press the letter in the top left (red arrow). This letter is the current ATIS letter. Additionally, I have highlighted the ATIS maker URL. This URL translates the weather and runway data into the ATIS format. To set the ATIS, you need to
- Enter the airport ICAO in capital letters to the ATIS airport field
- Press Get METAR to get the current weather
- Add the correct departure frequency at airports where pilots are supposed to change frequencies automatically after departure by adding &depfreq= and the frequency, for example, "&depfreq=129.350" for EDFM
- Press the Test URL button and check the ATIS in the large text box for errors
- Check the Automatically generate new ATIS using the URL box
- Press the Connect ATIS button to connect the ATIS
If everything is set up correctly, your ATIS Setup Dialog should look like the following. Additionally, the ATIS frequency will be displayed in the top menu bar (red arrow).
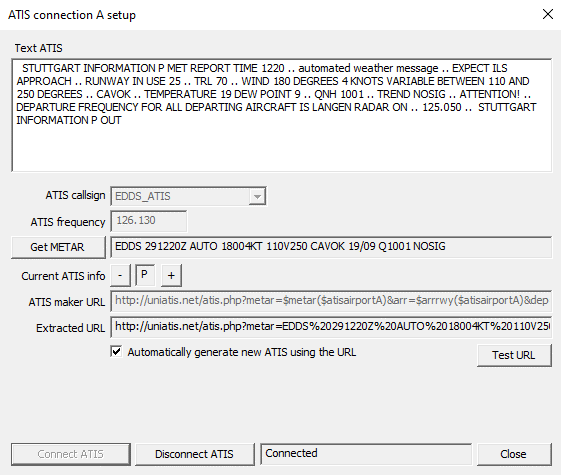
ATIS Setup Dialog
Start Audio for Vatsim
Finally, you need to open Audio for Vatsim and press Connect in the top left. It should automatically display the relevant frequencies for you. Press TX and RX (transmit and receive) to listen and speak on the corresponding frequency.
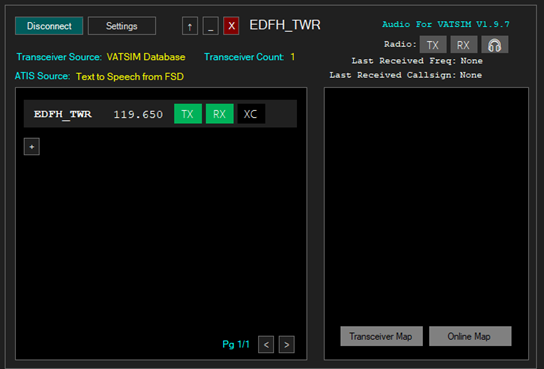 external Audio for Vatsim (AfV) software
If for whatever reason your station is not listed, you can press the + button and enter the ID, e.g. EDFH_GND.
Departures
Once you have completed the above steps and have logged onto the network, the relevant lists will start populating with information you will require to manage your aircraft's state. These are required not only for yourself but also for the adjacent controllers so that they are aware of an aircraft's intentions. An aircraft's state consists of ground states, squawk assignments, etc. which will be further explained in this section. Please note that this is an extremely critical part of controlling and is essential for your success in later trainings/examinations and is therefore mandatory for all controllers.
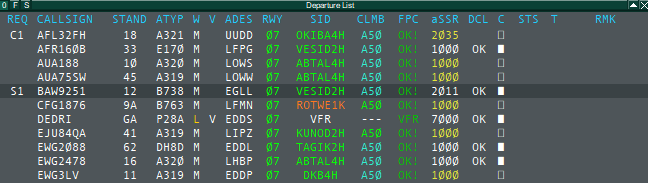
Departure List
Depicted in the image to the left you can see the "Departure List". This list shows all relevant information for aircraft departing out of your aerodrome. In the lesson, you heard previously, the functionality and meaning of this list were explained.
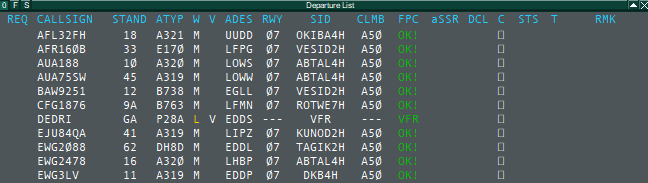
Departure List
SID Assignment
The plugin vSID will suggest a SID (white) according to the current runways in use and other factors according to the SOP. Usually this SID is the correct one, nevertheless it's within the controllers responsibility to check the suggested SIDs! When the manual plugin mode is used (default mode) the controller need to confirm the suggested SID with a left-click, then the SID is written into the flightplan (SID/RWY) and every controller will see this SID. A SID always need to be green (default assignment) or orange (non-default assignment) when issuing enroute clearance! When changing the runway manually, the SID need to be confirmed thereafter.
When the "Auto Mode" is used (".vsid auto") the SIDs will be set by the plugin and do not need to be confirmed anymore.
vSID is providing several information using different colors. You can find more information regarding the vSID plugin usage in the vSID Controller Manual.
Initial Climb Assignment
vSID suggests (white) the correct initial climb for every SID. It is set when the SID is confirmed. It will also display wether a "climb" (blue) or "climb via SID" (green) instruction is required (e.g. ROTWE SID out of runway 25 in Stuttgart - see image below).
Squawk Assignment
Additionally to completing the SID assignment, you must also assign a squawk to the aircraft. This can be done by simply clicking on the corresponding table row under the "aSSR" header. If you right-click, you can assign a specific squawk code by entering it manually or simply selecting VFR for squawk "7000". Note that yellow squawks are those, that have been assigned, but however not been set by the aircraft yet. After completing this, the list should look similar to that shown in the image.
When using vSID in manual mode, the squawk will automatically be assigned when the SID is confirmed.
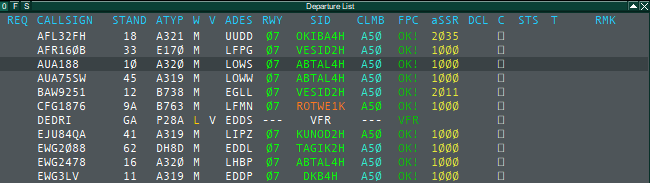
All Squawk Codes have been assigned
After completing the above steps, the list should look similar to the one above.
Enroute Clearance
Once you have issued the pilot with an enroute clearance, you set the so-called "clearance received flag" as shown in the image. This can be done by simply left-clicking on the corresponding checkbox. This checkbox acts as a reminder for yourself and for other controllers in the event of a handover to another controller.
All aircraft with the "clearance flag" have received the enroute clearance
Ground States
Ground states are an important aspect of keeping the "big picture" - a phrase you will hear many times throughout your training as a controller. These states not only help you to remember which clearances have been issued to which aircraft but also help the surrounding controllers by informing them of your plan, allowing for a more efficient and coordinated flow of traffic at your aerodrome. These states are propagated to all surrounding controllers making them inevitable for controlling.
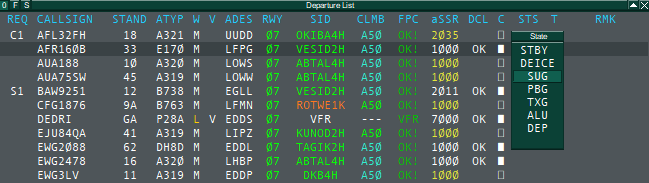 Ground states menu
Should you forget to set a ground state, EuroScope will warn you about this by displaying the error above the tag. Please take care and ensure that these states are always up to date.
SUG - Startup Given
Assuming you are able to provide the pilot with a startup clearance you now set the ground state to SUG (Start Up Given). This can be achieved, by clicking on the corresponding row under the "STS" (Status) header. A menu, as shown in the image, will open allowing you to select the appropriate ground state.
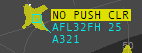
PBG - Pushback Given
Once the pilot requests pushback and the clearance has been granted, the ground state is no longer required to be in the SUG state. Instead, we select the PBG (PushBack Given) state which indicates that the aircraft has been cleared for pushback.
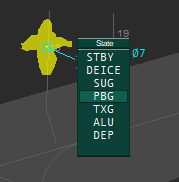
Ground Status menu access through the aircraft tag
Note: As you can see in the image, we aren't using the departure list to assign the corresponding ground state. This can also be done directly through the tag!
TXG - Taxi Given
After an aircraft has been issued its taxi clearance the state, once again, changes. In this instance, since the aircraft has been cleared to taxi, the TXG (TaXi Given) state would be selected.
ALU - Approved Lineup
The aircraft has now taxied to its assigned holding point and has been cleared to line up (no takeoff clearance given). The ground state is once again adapted to reflect the current situation of the pilot and is thus set to ALU (Approved LineUp). Note that this step can be ignored if the aircraft has been cleared for takeoff before requiring an explicit lineup clearance.
DEP - Departure
Once the aircraft has been cleared for takeoff, the final state is set. The DEP (DEParture) state shows that this specific aircraft has been cleared for takeoff.
Arrivals
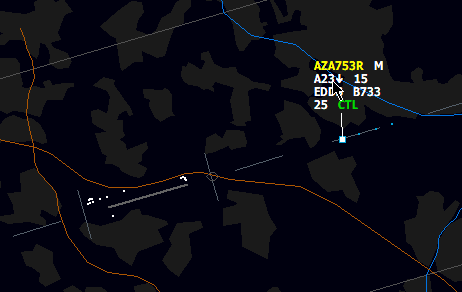
Finally, let's look at handling arrivals. We will look at the tower view first, this is where you will see the arrivals while they are still in the air. You can find it by opening the corresponding XXXX_TWR.asr file.
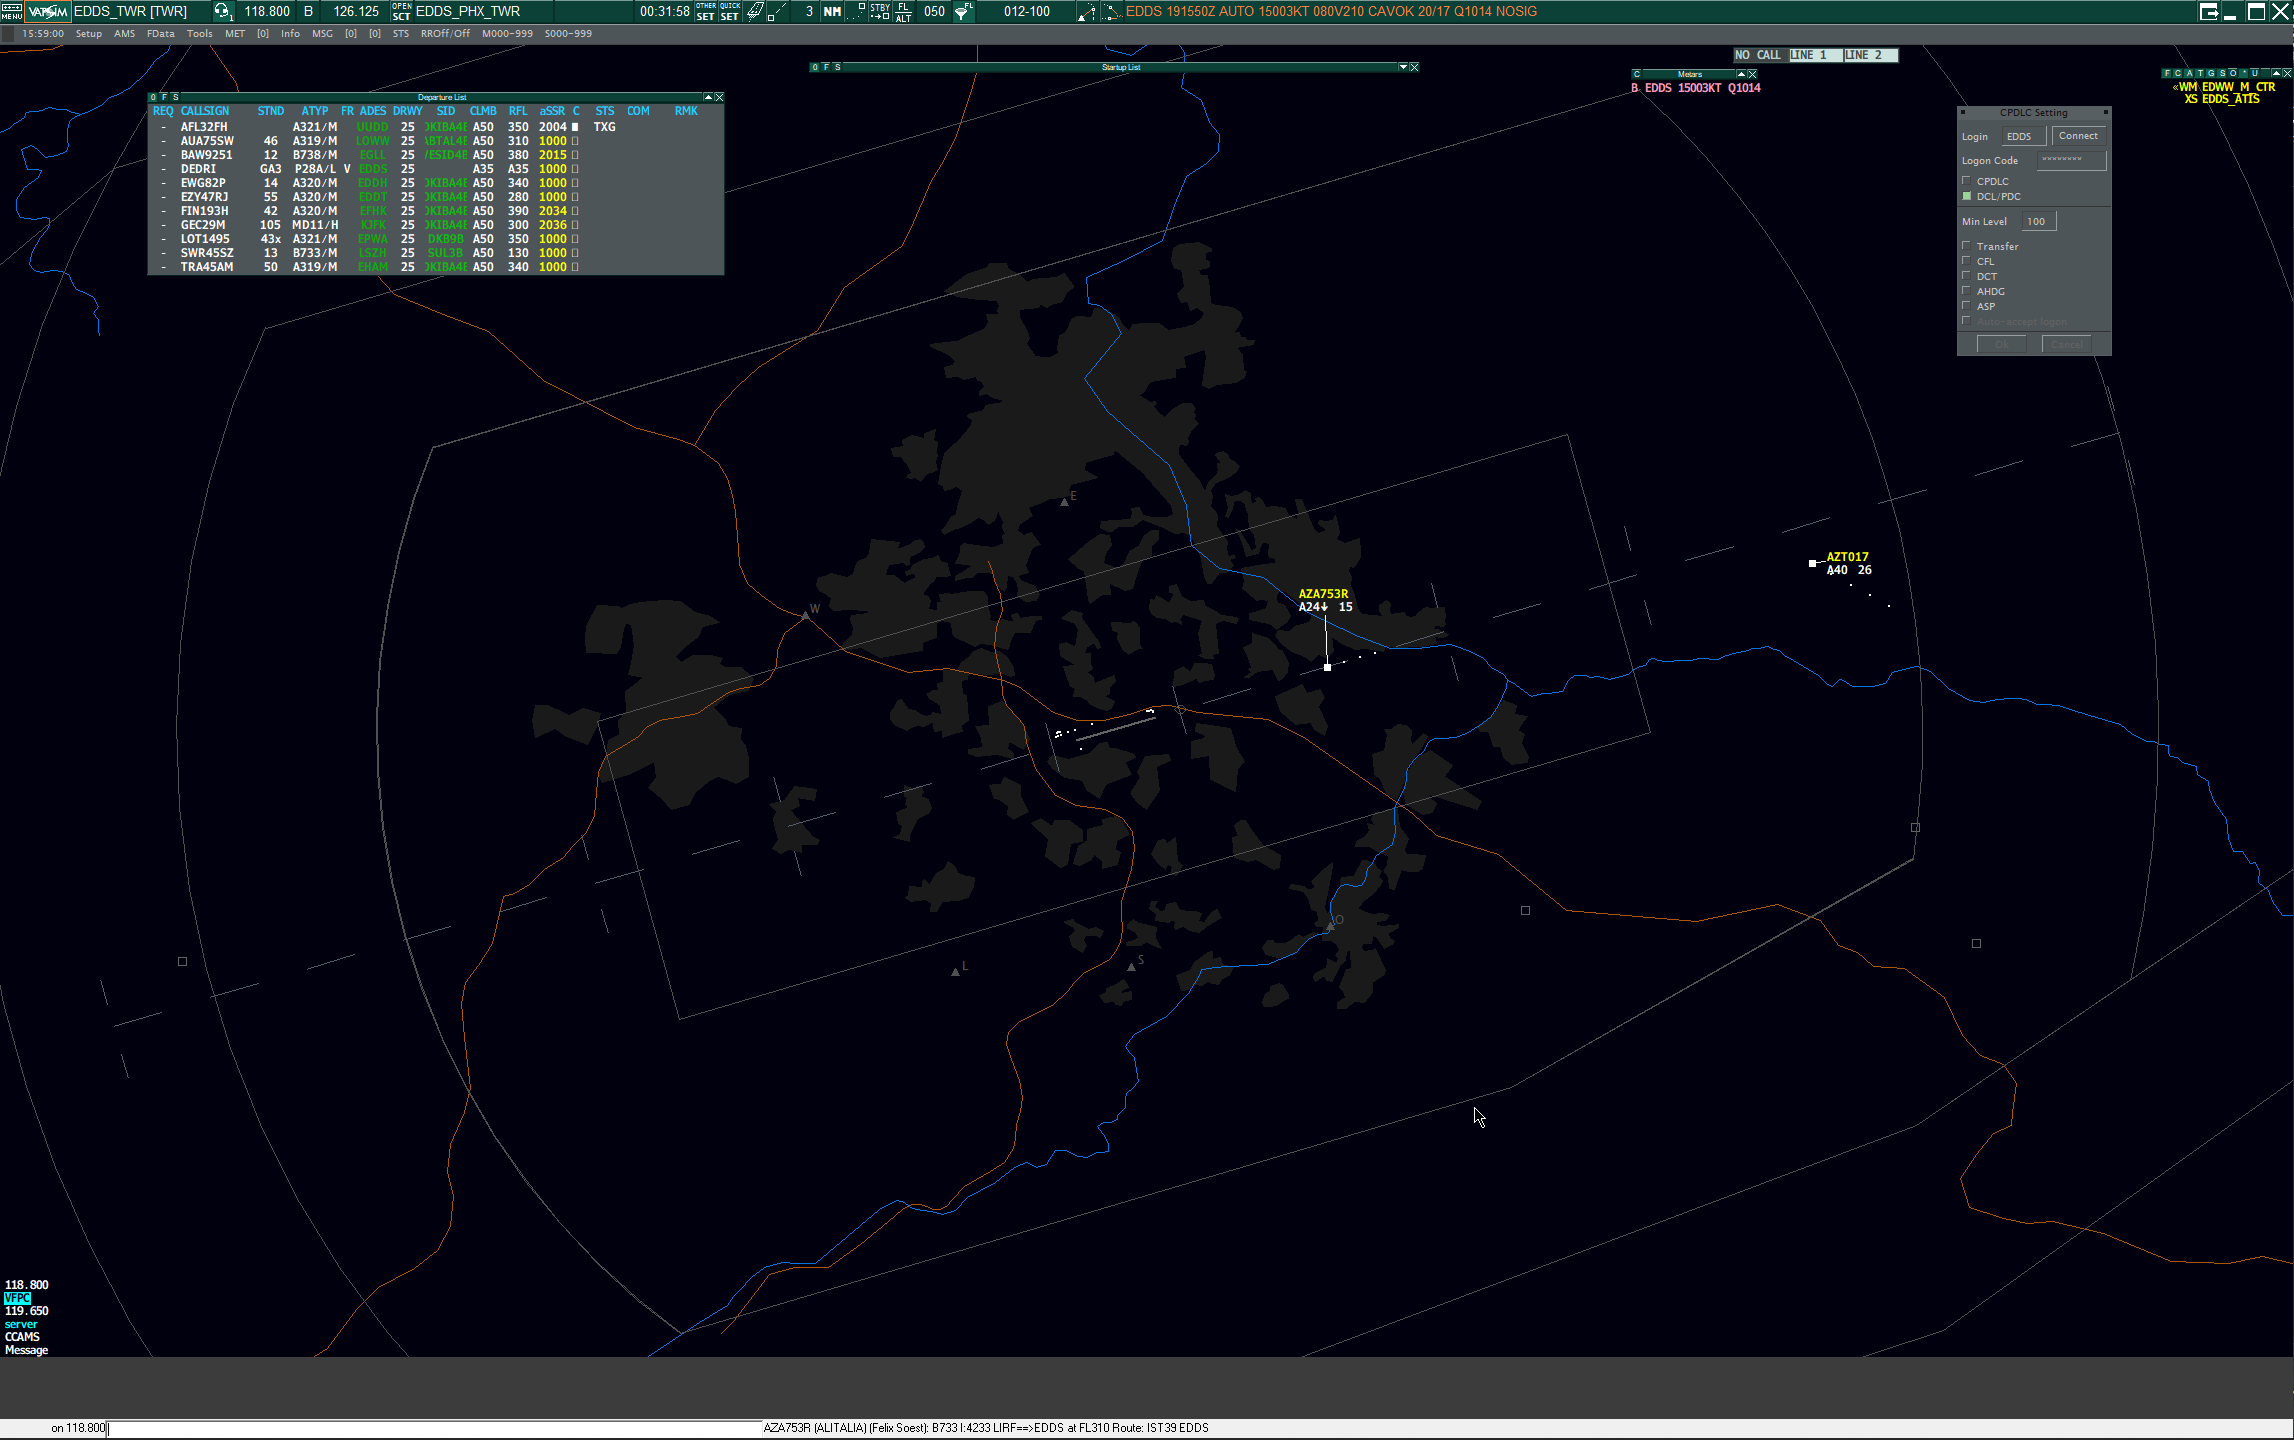
Once you have given the landing clearance, you can press on the current altitude in the Tag, which will set the cleared-to-land (CTL) flag. This will remind you that you have given the landing clearance.
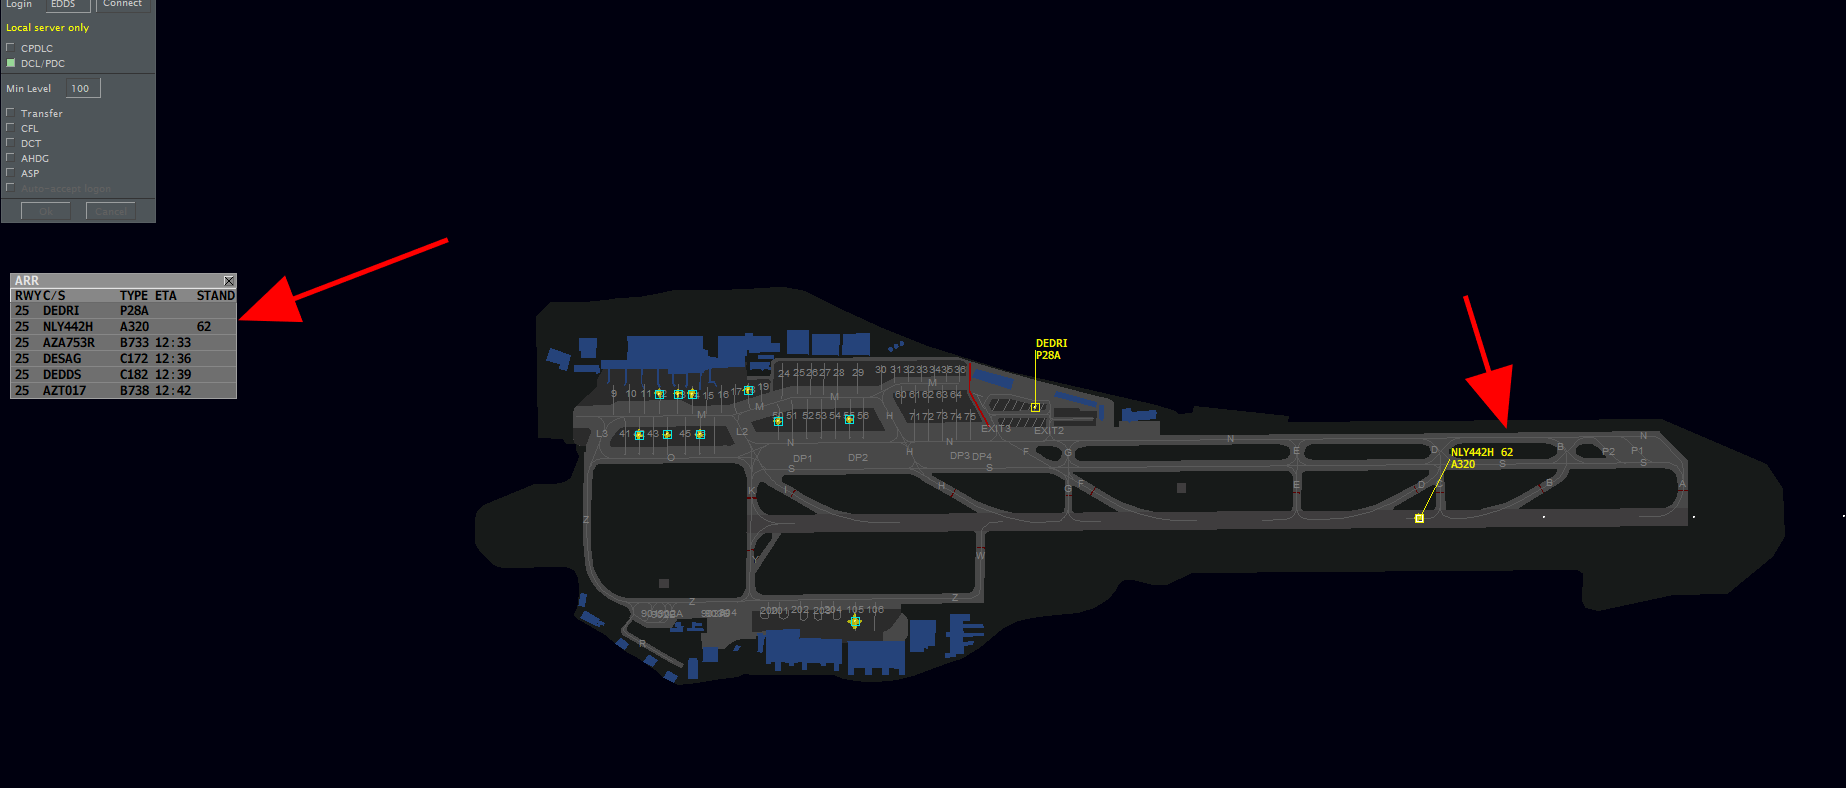
On the ground screen, you will see the aircraft shortly before it lands. A plugin will determine the arrival stand, it is shown in the aircraft's tag as well as in the arrival list (red arrows). If no stand is set, you can request one by clicking STAND -> AUTO in the aircraft tag. It is recommended to do that before landing, in case the inbound needs to vacate to a specific direction (e.g. south) for a specific stand, and the controller has to inform the pilot prior to landing.
Alias

As there are several ways for a pilot to communicate with ATC, Euroscope has implemented a way to communicate with pilots quickly via text only.
The Alias function allows you to send a predefined message to a pilot by entering a specific command in the command line. For example:
.ctl => Wind 270/8, runway 25 cleared to land.When you type an alias in the command line, it appears in the following format after pressing the space bar.
.clrv => Cleared to $arr, $sid departure, flight planned route, climb via SID to $temp, squawk $squawk.
.t => Taxi to holding point runway $deprwy via $uc($1).
There are two different parameters in the aliases.
- $ followed by certain information, for example, $winds. Euroscope enters the current wind automatically
- $ followed by a number, for example, $1. In this case, you have to do a manual input.
Let's make an example:
DLH123 is ready to taxi and is writing on your frequency. To respond, click on the aircraft, type ".t" in the command line, and press the spacebar. You now have the raw alias code that needs to be edited.
DLH123, Taxi to holding point runway $deprwy via $uc($2).


While Euroscope fills in the departure runway automatically by copying the departure list, we have to enter the taxi route manually. Replace the "$2" with the taxi route and press the TAB key. The result should look like this.
DLH123, Taxi to holding point runway $deprwy via $uc(M, L2, K). => DLH123, Taxi to holding point runway 07 via M, L2, K.
Now all you have to do is press Enter to send the clearance to the pilot.
You can find a list of all available alias codes in the sector files you downloaded for EDGG EDGG\Alias\alias.txt.